
Thrifty Thursday ~ A Kelly skirt refashion
Thursday, August 08, 2013
I've been on the fence on whether or not I was going to blog this refashion. I love the Kelly pattern I used however I'm not really happy with the way I had to put this skirt together like a puzzle piece which resulted in seams that shouldn't be. First let's take a look at the tragedy it was before...

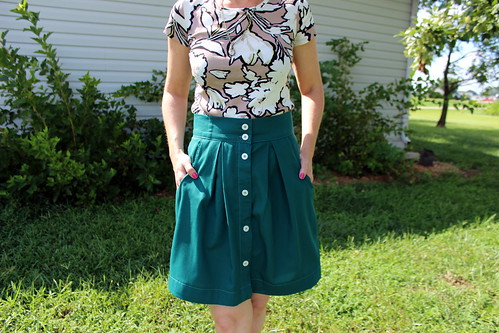
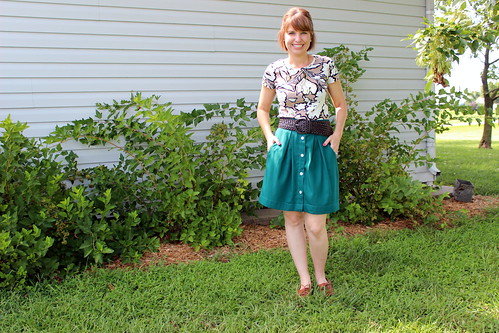
I know your looking at it thinking, whaaa?? Well the first thing I thought when I seen this was Megan Nielsen Kelly Skirt. I've been wanting to make this pattern for quite some time but you see my sewing machine turns into a real bitch when it comes to buttonholes. I can't figure it out. I can practice for hours and it works perfect but when it comes time for the real thing I end up with the most janky looking buttonholes known to man. I thought this would be the perfect way to cheat and use the existing buttonhole placket. I'm also a fan of green. While it's not really this particular color of green it did however win some bonus points with me.
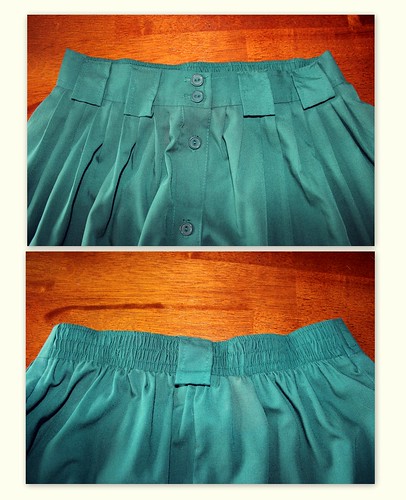
So first things first I cut that awful looking waistband with belt loops off and prayed I'd have enough from the excess length to make the waistband. I also cut the the side seams open so I ended up with one back piece and two front pieces. For the front since I already had my button placket I placed the pattern piece accordingly and cut with fingers crossed and did the same with the back piece. So far so good. The only difference so far between my Kelly and yours is that my back piece already had a cb seam so I just had to deal. All was well until it came time to cut the waistband and pockets. I didn't have a long enough piece for the waistband so I had to piece two together which resulted in two seams, the existing cb seam and the one I had to create. It would of been cheesy if the two seams would of perfectly aligned with the side seams but that was not the case. Oh well, I was not defeated since I planned on wearing a belt with this skirt anyway. I somehow managed pockets. I had to make them a lot smaller and used some leftover fabric from my stash for the insides. I can barely get my hands in them but hey whatevs!!
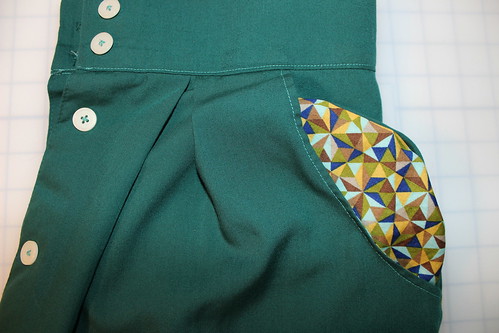
The construction of this skirt was great..well of course it was I got to avoid probably the hardest part, the button placket!! I only had two buttonholes to make and yes they turned out janky! argh!!! I used a contrasting thread and topstitched as the pattern suggested. I switched out the buttons for some plain white ones and really like how they pop.
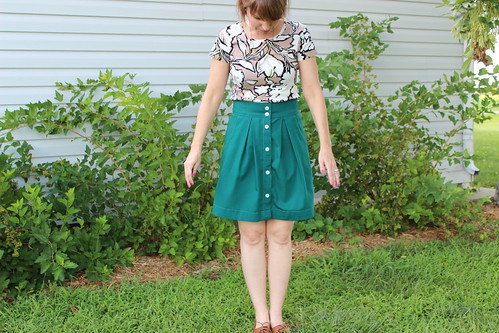
I do have to say it's a major improvement from it's former self. And it's sooo dang comfy!!
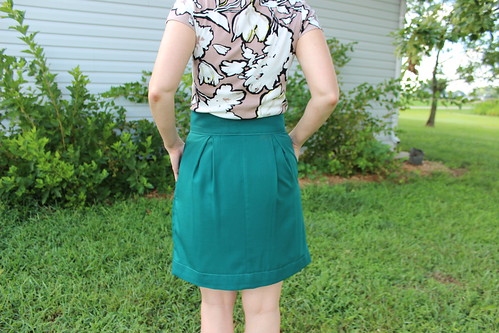
Here you can see that seam in the waistband I was talking about...sigh...
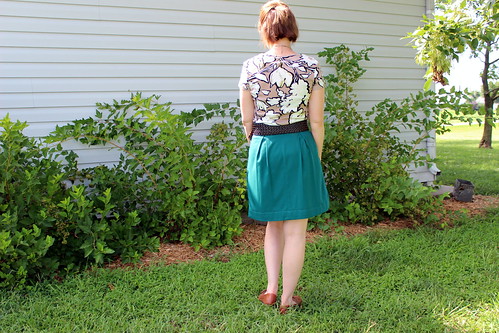
Don't you hate when you have a belt with a floppy end??
It just kinda wants to hang there and flop around.
My hubby was outside washing his truck when I was taking these pictures. He was jamming to Pantera so I just felt like I needed to...

So I dunno, not my favorite refashion..that waistband seam just really bugs the crap out of me! But no one has to know as long as I wear a belt, eh? I do however love this pattern and will make properly once I figure out my buttonholer!!
Here's what I'm working on next..
 | ||
| Sis Boom Meghan Peasant Dress ~ Ikat knit Mood Fabrics |
Has anyone worked with Sis Boom patterns before? I just happened to run across this pattern on Kollabora and thought the Ikat jersey knit I had from Mood would be perfect for it since I didn't have enough for the Miz Mozelle I had originally planned. sniff, sniff.


25 comments
Hehe love the last image https://www.facebook.com/SassySewingBees
ReplyDeleteProbably no one other than a fellow sewist would notice that seam in the waistband! And it does look awesome with a belt so that fixes that problem anyway.
ReplyDeleteGreat refashion! No one will notice the seam on the waistband!
ReplyDeleteFab refashion! I would never have known about the seam-- no worries, dude!
ReplyDeleteLove this! The colour is beautiful (but then I am a big fan of green...). The waistband looks fine, especially if you wear it with a belt! Oh I feel like I need to make myself another Kelly now...
ReplyDeleteI'd be really proud of this! If the seam bugged you enough, could you cover it up with a belt loop, and add a symmetrical one too? I love this skirt :) well done! :)
ReplyDeleteA belt loop is a good idea!!
ReplyDeletethank you! This is such a great pattern. Can't wait to make another just as soon as I tackle my buttonholer!
ReplyDeleteThanks dude!!
ReplyDeleteThanks!
ReplyDeleteYou totally turned something dowdy into something cute. Hey, I remember you unpacking that Ikat fabric from your Mood parcel - can't wait to see it made up
ReplyDeleteI really love this refashion - the colour is perfection! I don't notice the waist band seam that much, but it is perfect with a belt. Belts fix everything :)
ReplyDeleteI think you did a great job on this refashion, and what a clever idea to use the existing buttonhole placket.
ReplyDeleteThis looks great! A Kellly skirt in (almost) Kelly green! I really like the look of this skirt, and I kind of feel I should make it (jut for the name!) but have resisted buying the pattern so far - trying not to buy too many before I have time to make them! Haven't yet tried buttonhole on my machine so I still have that adventure to come!
ReplyDeleteI hope you have better luck with your buttonholer than I have with mine. You should try this patten though. It's pretty awesome!
ReplyDeleteThanks!!
ReplyDeleteI've been dying to use that fabric! Hope the dress turns out!
ReplyDeleteYes we tend to pick over every little detail that most wouldn't even notice.
ReplyDeleteRock on!!
ReplyDeletecute! I wasn't sure about the button front skirt look, but after a few attempts at buying thrift store ones I finally got a denim skirt that looks good. I might take a leap and make one myself one day. Nice using a button front skirt to make a button front skirt!
ReplyDeleteI love your refashion!! The waistband before was SO weird. With the thousands of belt loops in the front and the elastic in the back. ?? But, I think it looks great after, I love that Kelly green colour too. I have a solution fo the belt ends flapping issue: You hammer on snaps to each INside of the belt where it is flapping, then snap it together, without the fancy snap backing so that the snap is invisible (except for a teeny round metal circle).
ReplyDeleteOh that's a great idea!! I'll have to give it a try. I've been using a bobby pin to hold it together...not such a good idea. lol
ReplyDeleteWell, bobby pin has that, you know, thrifty environmental reduce, reuse, kind of vibe! If that's what you're going for. Lol.
ReplyDeleteGreat refashion! The waistband seam isn't too visible, I wouldn't have noticed if you hadn't pointed it out! I use double sided tape to keep my flappy belts in place. It might not work for thicket belts though, mine are all thin so it doesn't matter :)
ReplyDeleteExcellent refashion! You can hardly notice the old waistband seam, and using the existing placket was a great idea. That's a great shade of green for you too!
ReplyDelete