
Crazy Cat Lady Challenge: Leopard Print Wrap Tunic..Meeowww
Thursday, November 06, 2014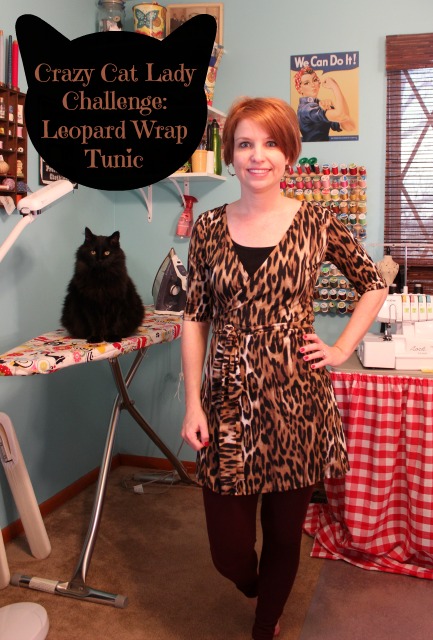
According to Wikipedia a cat lady is a "single lady who dotes upon her cat or cats". Throw the word crazy in there and suddenly that young lady has turned into an old widow who has dozens upon dozens of cats (see Urban Dictionary). In the sewing world a crazy cat lady isn't defined by her age or even the number of cats she owns. Nope! Successfully sewing a wearable garment out of a cat themed fabric crowns you as the crazy cat lady in our world. Me crazy? Yep! I've got the clothing to prove it and the 3 cats...all in the house... and I'm allergic...
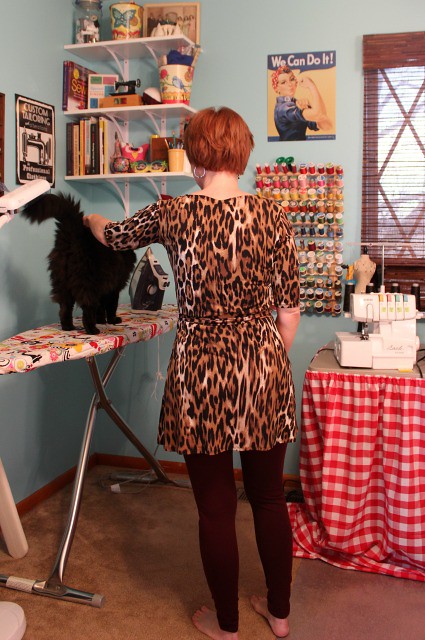
Give em your best crazy face Orlando! haha
My leopard print knit came courtesy of a sweet win from Katie over at the blog A Girl Named Katie. This is my first time working with ITY knit. It's so comfortable and breathable. And when you find it wadded up in a ball in the corner of the closet, no worries, it's totally gonna be wrinkle free and still wearable. When Erin announced the Crazy Cat Lady Sewing Challenge this fabric was the obvious choice.
For the pattern I chose Sew Over It's Ultimate Wrap Dress. I've been wanting a real deal wrap dress for a while, I've made a faux wrap dress and I found the real deal to be far easier and quicker to sew up. So are some of you thinking, "Whoa Shanni that's a scandalously short dress!" ?? Well you'd be right! I didn't have nearly enough fabric for the dress so I took 3.5 inches off the hem and turned it into the ultimate wrap tunic. I've paired it with some maroon colored leggings though I think black might look best.
Sizing & Construction:
I cut a size 8 after doing a quick tissue fit on my dress form. The shoulders were a little wide so I narrowed them by 1/2 inch. The instructions are geared towards beginners and uses a regular sewing machine. I chose to use my serger and got a little confused on how to assemble the side of the dress that has the opening for the tie.
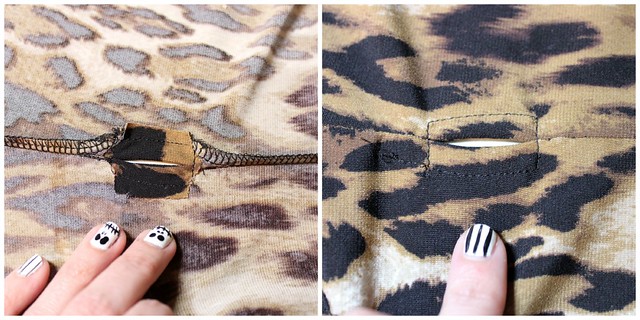
It's pretty straight forward if your using a regular sewing machine but I wanted nice serged edges. I used my sewing machine and did several stitches making sure to back tack on each side of the hole. I then serged my edges stopping and starting at each end of the opening. To open the seam I clipped into the seam right above my sewing machine stitches. I hid my serger thread ends behind the hem opening and topstitched to secure. I hope the picture is more explanatory than my words. I could never be a teacher.
My shoulder seams are stabilized with clear elastic. The instructions suggest you gather your sleeves to ease in. I didn't find that to be necessary with a knit. I just stretched the armhole to fit. A big "UGH"..neckline facing. Failed it! When attaching I stretched it just like you would a neckline binding. I don't think this was at all necessary as the end result was a facing that rolled forward and didn't want to lay flat. I understitched the facing to keep it from rolling but it still wanted to flip up. I ended up topstitching the facing in place and then trimmed the facing down close to the stitching line. Not the prettiest on the inside so sshhh it's our little secret.

I didn't like the look of long sleeves and they weren't awfully comfy either so I shortened them to right above my elbows. I used my twin needle to topstitch the hem on the sleeve and the hemline. The front hemline has a curved edge that is perfected by creating little folds at even distances, pressing them in place and stitching. ITY knit doesn't hold a press well so creating a smooth curve was tricky. I had my folds perfected and a smooth curve in place but as soon as I'd lift the iron the folds would fall right back open. I even tried using wonder tape to hold my folds in place. My curves aren't perfect but I feel like they will be much easier to create using a jersey knit.
Details:
Pattern: Sew Over It Ultimate Wrap Dress available here 13.00 UK approximate $20.00 US
Fabric: ITY knit from Fabric Mart
Needle: Ballpoint and twin needle for topstitching
Notions: Clear elastic for shoulder seams
Changes: Shortened hem by 3.5 inches to tunic length. Shortened sleeves and narrowed
shoulders by 1/2 inch.
Next time: Get rid of that facing! Use bias instead. Adjust lower back for swayback. Even when I
have the wrap tied as tight as possible I still have gaping which is why I'm wearing a
tank underneath. Is there anyway to correct this?

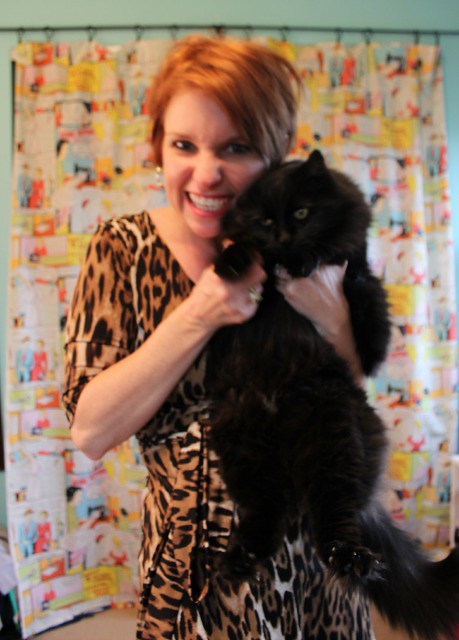
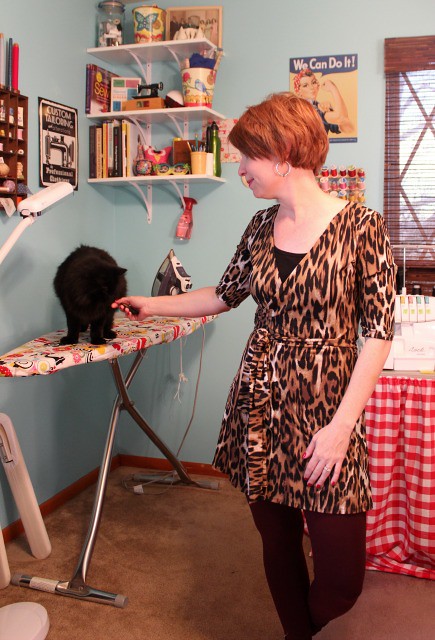
Vito was getting jealous of all the camera time Orlando was getting...
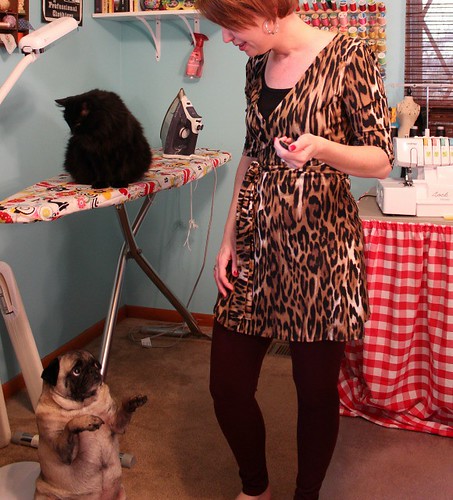
His face! I can't take it sometimes!!


41 comments
Your pug!!! He is so adorable - is that face for real? Hilarious!!
ReplyDeleteThat ITY is horrible to sew with, needs loads of pins or basting. Your dress looks great though despite your issues. Where is this gaping you refer to? I can't see it.
OMG VITO'S SAD PUG FACE!!!
ReplyDeleteMeow! That is sassy! But Vito's face. I just can't get past it!
ReplyDeleteWell it doesn't look bad in these photos. I believe its because I've worn a tank underneath which gives the fabric something to cling too. When I wear it without the tank the neckline gapes open in places and there is no way I'd be able to bend over without showing off the goods.
ReplyDeleteAnd yes, the many faces of Vito! lol!!
I LOVE this dress! And how have I missed this challenge? I need to get with it. I have a pile of cats and am allergic too. I think I may pass out now... Vito and now that ball of fluff cat? How do you even get things done in life living in the cute overload house?
ReplyDeleteI love your wrap dress and your dog's adorable face at the end! What a cutie! I'm also allergic to cats, but I love mine too much. :)
ReplyDeleteOrlando and Vito!! I die!!! :) Just love your dress and its perfect now for a tunic with leggings, but hey, you could be that sexy chick in the scandalously short skirt as well. I have that gaping problem, too and don't know how to fix it, although I've never made a wrap dress with a knit. It seems like in wovens it's always present on me, which is why I don't make wrap dresses any more. I am planning a knit one, so I'll see if that happens. I guess that's what a cami is for!
ReplyDeleteGreat looking tunic! Your pets are adorable--Vito's pouty face is hilarious!
ReplyDeleteOh my goodness Vito is so adorable! I love the little standing on his hind legs pose. Orlando is so cute too! Okay pet cuteness out of the way - I really love this wrap tunic - I think it looks great with leggings! I would never have noticed any of the issues you pointed out with it.
ReplyDeleteI'm not really sure how to get rid of the gaping issue, but I think some people add a little closure to keep things in place. Maybe check out Cashmerette as she has made tons of wrap dresses. I'm not the biggest ITY fan as it so hard to work with when you need it to hold a press, but I do love it for leggings.
PS: Your halloween nails are awesome!
Omg I love the one with his paws in the air!!
ReplyDeleteThis is gorgeous Shanni! I love this pattern and I've got it to make up, although I will watch the length - a friend of mine made it up to wear to work and then found it was both too short and too low cut for work! I will take your comments about the binding into account! Also, I must say, I love your Halloween nails! And Vito, man that dog is cute!
ReplyDeleteNot to disregard your darling make here, but OMG, that first photo with Orlando is so awesome! He's the perfect black, fur ball silhouette of a kitty :D And Vito is killing me in the last two photos; gah! What a cutie!
ReplyDeleteThe hem looks just fine in the photos, but I must admit I don't like hemming knits in general! More often than not, mine turn out wavy or stretched out looking, regardless of my methods. Despite the challenges, your's looks terrific!
I think Vito has his own fan club - perfect!
ReplyDeleteLove the tunic. I'm quite impressed you were able to hem it. Most of my ITY dresses stay unhemmed because the hems I have done on ITY projects always end up wavy.
ReplyDeleteMy youngest son (who still thinks he's a cat much of the time) really likes these pics. He meowed constantly as I was scrolling down to read your post. He means it as a compliment.
I made a faux wrap dress from ITY and while I love the lack of wrinkles, it really is a pain to sew! I think I ended up using Steam a Seam in the hem (this was before I'd discovered the washaway tape). Your tunic is so cute!
ReplyDeleteVery cute tunic. Wrap styles always end up being a bit low on me so tanks are essential. Also, Vito has the cutest expressions ever!
ReplyDeleteWhat a happy sewing crew! Good to hear your advice on this one. I really like the finished dress! No suggestions for the fit though, sorry.
ReplyDeleteThanks Amy!
ReplyDeleteVito is a ham for sure!
ReplyDeleteThanks! Yes ITY is a pain to sew! Now I know. I love that washaway tape!!
ReplyDeleteLOL! That's so funny!
ReplyDeleteI never thought about leaving it unhemmed. That's a great idea! I'll have to do that next time.
Orlando is pretty photogenic isn't he? and Vito well we all know he's a ham!!
ReplyDeleteThanks Kelly! I think next time I'm make this up I'm going to draft a wide band for the neckline. I think that may help make it more appropriate for work.
ReplyDeleteHe's so funny! He hates when he's not getting the attention.
ReplyDeleteWhen I was making this I thought, Man this fabric would of been great for leggings! I thought about making a little closure too. If I make this dress again I think I will try and draft a wide band for the neckline.
ReplyDeleteThanks!! Vito sure does make me laugh!
ReplyDeleteI thought about next time I make this drafting a wide band for the neckline. Lladybird made up vintage Vogue 1610 and I liked the wide neckline band it had.
ReplyDeleteI'm not quite as allergic as I used to be when I was younger but nevertheless I wouldn't trade them for the world. I can handle a few sneezes. lol.
ReplyDeleteHa! It's hard sometimes, especially when they are all piled in my lap!
ReplyDeleteNever a dull moment with Vito around!
ReplyDeletehehe!! He knows how to work it!
ReplyDeleteVery cute! Love the idea of a tunic with leggings. Always looking for something to cover the bum:)
ReplyDeleteOMG Orlando on the ironing board in the first photo is way too funny! Haha! Look at that face! Poor Vito looks bummed there's no Crazy Dog Lady sewing challenge. Your dress is as cute as I'm sure it is comfortable :)
ReplyDeleteI loooooove this on you! It looks so great! Orlando and Vito are both really on point here... they're so photogenic!
ReplyDeleteThanks! Vito and Orlando know how to work it!
ReplyDeleteVito was super jealous.. but it doesn't take much. lol!!
ReplyDeletethanks!! I always have to have the bum covered when wearing leggings!
ReplyDelete<3 Vito in the photo before the last :)) The tunic looks cool as well!
ReplyDeleteI wanttttttt this outfit so bad!!!! The fabric is my dream leopard print, so I may have to check and see if there is any more in stock!
ReplyDeleteThat tie opening modification you did with the serger turned out great!!!
And you are such a good sport about having cats when you are allergic. My husband is allergic too and even though I want a third cat, I know we can't get one. It would probably slowly kill him.
Thanks for participating in the challenge, Shanni. Your garment is one of my favorites. xo
Lovely tunic! I'm not sure that this is correct, but I think if you were to shorten the neckline, it would help with the gaping. I think I have also heard/seen something about adding a bit of elastic to the neckline edge, not so much as to gather it a lot, but just to pull it in a little, but I think this was mostly for wovens.
ReplyDeleteI considered adding elastic to it as well as I think this probably would help. My next version I think I want to add about a 2 inch band to the neckline.
ReplyDelete