
Tutorial: Owl you need is a sewing buddy...
Sunday, July 28, 2013
My biggest sewing pet peeve...misplacing my seam ripper(s). I spend more time looking for my seam ripper than I do anything else. I lose it, go buy another then pretty soon the lost one shows up...lose it again, buy another..you see it's a vicious cycle. While browsing Pinterest one day I spotted the cutest owl remote control caddy. This inspired me to make my own "Owl You Need" sewing buddy for the Dear Stella/Kollabora project challenge.
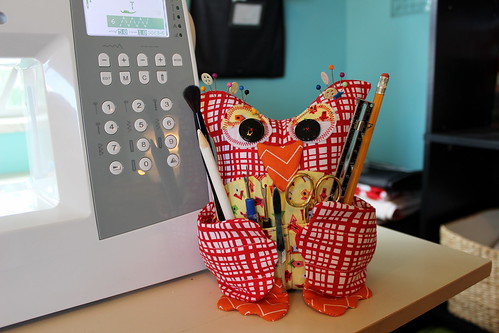
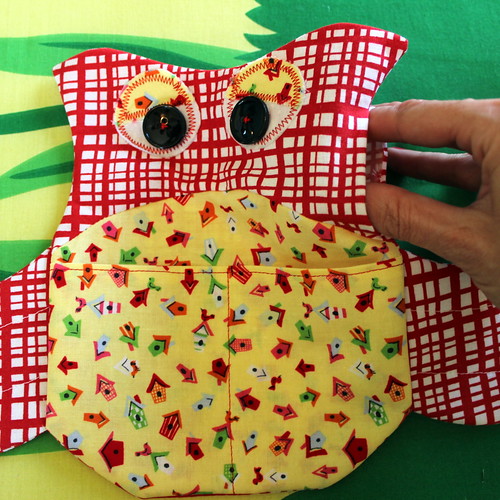
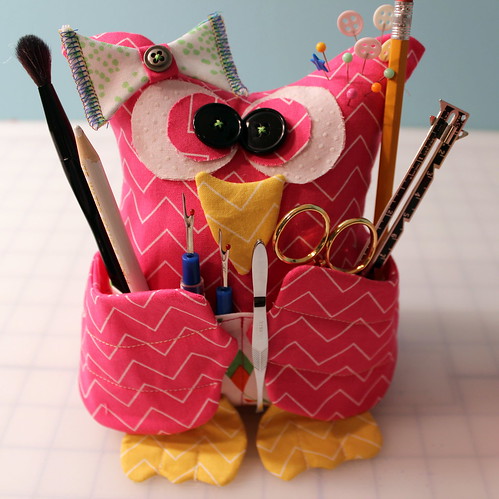
This wise old owl sits next to your sewing machine and holds all your important tools for easy access...marking tool, seam gauge, a seam ripper (or two), tiny scissors to cut those loose threads and a fluff brush and tweezers to keep your machine clean and happy. You can even use him as a pin cushion!
Need your own sewing buddy?? Why don't you download the pdf instructions/pattern and sew along with me in this tutorial! It's free!!
CLICK HERE FOR PATTERN
**when printing your pattern make sure in your printer options, Actual Size is checked.
**if you have trouble downloading the pattern from Dropbox you can also
download the pattern from Craftsy here. You will just need to sign up for an account which is
totally free.
**this pattern is my own and I designed this for my readers for free.. I ask that you please don't
distribute or sell this pattern, finished or otherwise..Thanks!
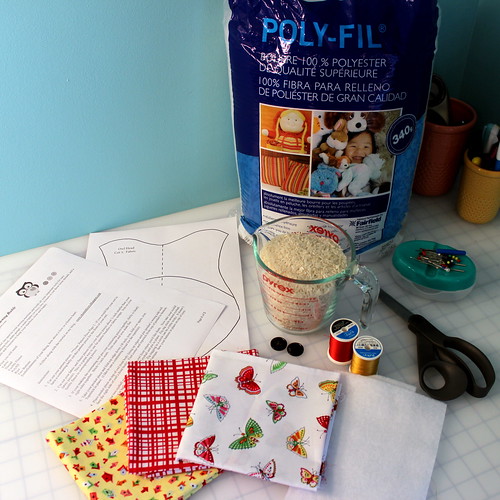
What you will need:
Pattern
Fabric - I will be using Dear Stella Design's Clementine fat quarter bundle
Thread
Pins/Needle
Scissors
Fusible Fleece
Polyfill
Rice
Two Buttons
Any embellishments you desire..how about a bow or a button heart?
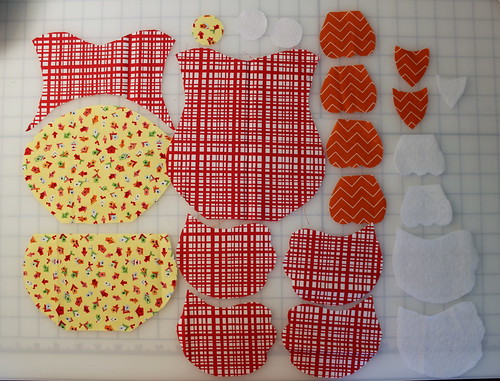
Step #1...
Cut out your pattern pieces. *Note: Pattern Piece page 2- if you would like your owl to have a contrasting belly cut this pattern piece out for the front of your owl. For this tutorial I will be making this version.
 |
 |
Step #3...
If your making the owl front body only one color you can skip this step. For the contrasting owl front pin your two pieces together, belly to head, right sides together. Stitch 1/4 inch seam. Trim seam and iron flat.

Step #4...
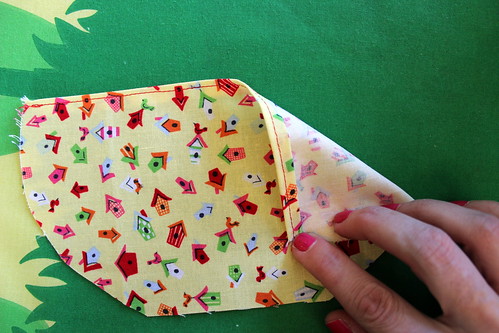
Take your pocket piece and fold top edge down 1/4 inch, iron, fold over again 1/4 inch and iron. Topstitch in place.
Step #5...
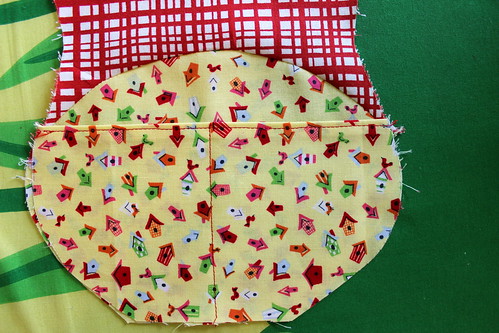
Place wrong side of pocket piece on right side of owl front body lining up edges and pin in place. Find center and topstitch from top of pocket to bottom.
Step# 6...
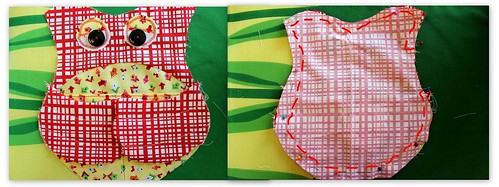
Take your two eyeball pieces and place on owl front where you'd like them. Now take your eyelid piece and cut in half. Place on top of eyeballs and pin in place. Zig zag stitch around eyeball and across bottom of eyelid. Zig zagging in a circle can be tricky. I found that stabilizing your eyeballs with a lightweight interface helps. Also instead of pinning in place you can use the awesomeness that is Steam a Seam or fusible web to hold in place. It doesn't have to be perfect. That's what makes your owl unique. You can attach your eyeballs anyway you like. See my girl owl below. I cheated and just used Steam a Seam.
Sew your buttons in place on top of eyes. | |||
| I can see!! |
Step #7...
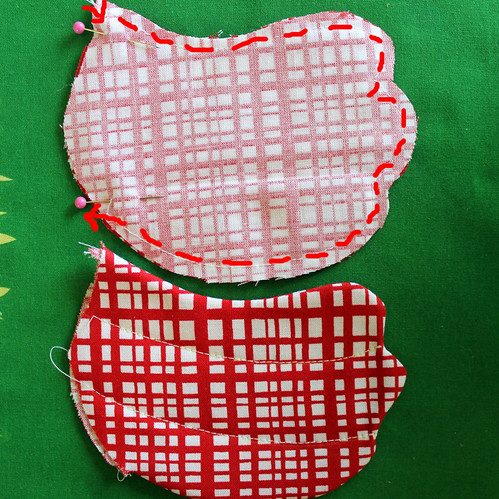
Take two of your wingy ding pieces and pin right sides together. Stitch 1/4 inch around edge of wing and make sure to leave end open so you can turn inside out. Trim seam 1/4 inch including the end you left open. Iron and turn inside out. I used a point turner to form fingers. Be careful that you don't poke through your seam. I speak from experience! Iron flat once wings are formed to perfection. Topstitch wing to create a 3 feather look. Repeat for second wing.
Step #8...
Place wingys on top of front owl body in correct spots lining up edges. Place owl back piece on top with right sides facing. (make sure your wings are arranged correctly so you don't catch bottom of your wings when you stitch around edges..hope that makes sense) Stitch around owl 1/4 inch leaving about a 2.5 inch opening at side. Trim seam and iron. Flip right side out, iron.
**Note: You may also chose to attach your feet here too as well. I actually tacked mine on to the front, which I go through in Step 10 but I later found that actually sewing them on here like you do the wings works just as well.
**Note: You may also chose to attach your feet here too as well. I actually tacked mine on to the front, which I go through in Step 10 but I later found that actually sewing them on here like you do the wings works just as well.
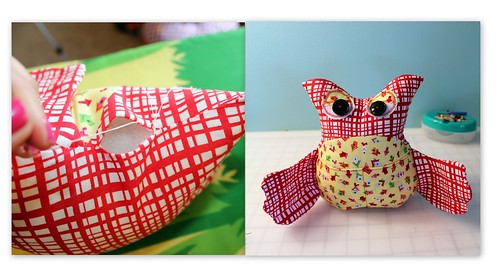
Step #9...
Fill bottom of owl with about a cup or so of rice to give it some weight so it will sit upright and not want to fall over like a weeble wobble. (there's a group for those if your interested!) Stuff the rest of your owl with polyfill. Stuff him good too! Slipstitch opening closed.
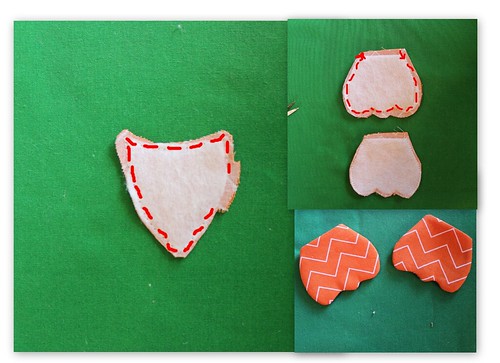
Take your beak pieces and place right sides together. Stitch around beak 1/4 inch leaving a small opening at side. Trim seam and iron. Turn inside out, iron and slipstitch opening closed. Now stick that nose on his face! You can either sew in place or take the lazy route like me...a little tacky glue works perfect!
Now do the exact same thing with his feet.
Now do the exact same thing with his feet.
 | |
| Sorry forgot to take a picture of the finished nose |
Step #11...
You are all finished! Now you got a little buddy to keep track of all your tiny sewing notions. You can leave his wings floppy or you can hand sew or glue them in place. I like to make mine look like he's hugging all my sewing gadgets.
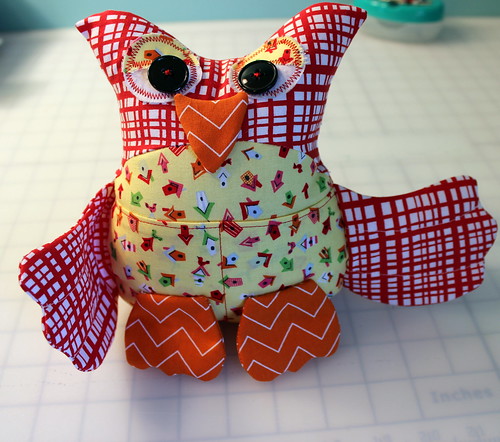
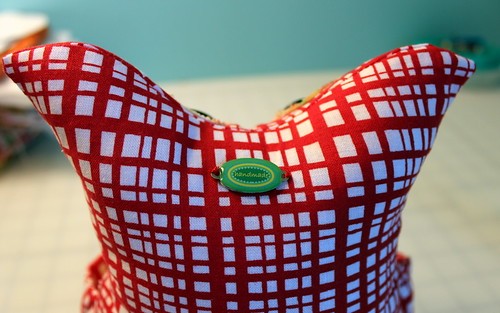
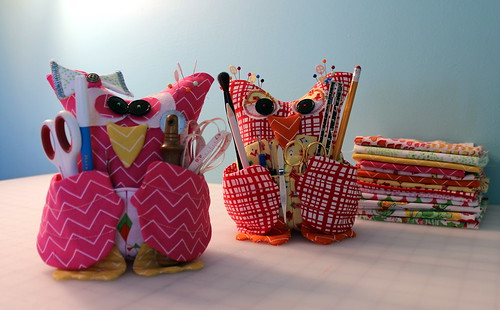
Embellish these little dudes how you want. I found these cute little handmade tags at Joann's. I added a bow for the girl. Now I can't decide which one I want to use!! They are both too cute!
Hope you all enjoyed this tutorial and make your own sewing buddy. I would love to see him/her! Email me a picture if you do!!
I have a couple other Dear Stella/Kollabora projects planned that I'm hoping to get done. Head on over to Kollabora.com to take a look at the projects submitted by the other bloggers. A lot of talented craftiness going on!!
Edit: Since releasing this free pattern I've gotten such a huge response and pictures of everyone's owls. I created a blog post showcasing everyone's buddies. You can see them all here.
Edit: Since releasing this free pattern I've gotten such a huge response and pictures of everyone's owls. I created a blog post showcasing everyone's buddies. You can see them all here.


68 comments
OMG! SO much cuteness in this post, I can't even take it! Love the owls! And so practical too :)
ReplyDeleteOoo Ooooo, Ooo Oooo. Sorry, I couldn't help myself! Cute and practical.
ReplyDeleteI get the owl part of your crypric previous post now.. "owls, nails and buckets"
ReplyDeleteCute, practical AND uses up some scraps. I'm making this for sure, thank you so very much for this project!
ReplyDelete/Hugs from Sweden
Shanni, these are ridiculously cute! Love 'em!
ReplyDeleteWould love to see yours! And please let me know how my instructions are...First time doing a tutorial so I hope I explained all well.
ReplyDeletehehehe
ReplyDeleteWhat a great idea, I'm always losing my seam rippers too!
ReplyDeleteThat's such a great tutorial! I just love the owls, they are so cute! I am going to make one for myself for sure especially because my seam ripper and scissors are living in an old yoghurt jar.
ReplyDeletecuuuuuteness :) must have a go at one
ReplyDeleteI wanna see!!
ReplyDeletethanks!!
ReplyDeleteI wanna see it if you do!
ReplyDeleteomg so cute!
ReplyDelete-Amy (www.thatssewamy.com)
So cute!! I've got to make one now!!
ReplyDeletethank you so much for this - they're gorgeous! and now on my "to make" list
ReplyDeleteI've made it now, the instructions worked very well! I posted it on kollabora as my very first project there, there´s a picture if you want to see it.
ReplyDeleteI love him!! So excited to see this made up by someone else!!
ReplyDeleteI couldn't love this any more!!! I am an owl fanatic and sew everyday. I will have one of these soon! Thanks for sharing!!!
ReplyDeleteThank you so much. This is adorable!
ReplyDeleteMUY LINDO LO VOY HACER GRACIAS
ReplyDeleteThis is OH SO CUTE! Thanks for putting it up. Am book marking this to make later. :)
ReplyDeleteOh girl I do love you and your great idees. Thank you oh so much, Ria
ReplyDelete(just a dutch granny that try's to wright in englisch???)
Really love how it looks, I think this wil be my next project!!
ReplyDeleteJust to say that I've made an owl! It was a great tutorial, thanks, and I've blogged about it here:
ReplyDeletehttp://fabricmaverick.blogspot.ca/2013/08/three-free-tutorials-and-happy-three.html
Suzie
Oh great! I'm going to go check it out now!!
ReplyDeleteI was hoping you could email me the pattern? The dropbox link isn't working for me :( summers1341@yahoo.com Thank you!
ReplyDeletesure thing! It's on it's way!! Enjoy!
ReplyDeleteYhank you !!!!
ReplyDeleteHi, I cant seem to download the pattern from your dropbox, can you email it to me? gigistreasures@gmail.com Thanks!!
ReplyDeleteThanks for the cute little helper. I love it especially since owls are so popular right now.
ReplyDeleteI can't seem to get the pattern to download. Any suggestions! Thanks
ReplyDeletecan you please send me the instructions and pattern on this cute owl. kimie.riddle@att.net Thank you so much.
ReplyDeleteIf you give me your email address I could email you the pattern pdf
ReplyDeletecould you also send me the pattern and instructions to my email shargibson@cox.net. Thank you so very much. You do awesome work.
ReplyDeleteCharlene Gibson
First thank you for the pattern. I was able to download it with out a problem. Second, I was wondering where you purchased the cute homemade tag? I can't wait to make mine.
ReplyDeleteI got the tag from Joann's. They were where all the quilting notions are. Would love to see your little guy when he's finished. I'm thinking of doing a Owl Parade here on the blog when I get enough pictures of everyone's owls.
ReplyDeleteWould you mind if I shared your Owl on my blog? I'm thinking of doing an Owl Parade here once I get enough pics from everyone. Thanks!
ReplyDeleteHow can I didn't the instructions with the pictures to follow? I have the pattern and written instructions.
ReplyDeleteBob
Are you referring to printing out the tutorial pictures above? I don't have that in a pdf format only the pattern and instructions. Can you try and print this blog post in your browser?
ReplyDeleteNot at all, go ahead and share Sune all you want(yes I have named him). Can't wait to see all his brothers and sisters!
ReplyDeleteThank you very much I like them.Hope to make them nex week
ReplyDeleteSoo cute!! Thank you so much for the tutorial and pattern. I can't wait to make one of my own.
ReplyDeleteSoo cute. I'm having trouble downloading the pattern. Is there any way you can send it to my e-mail oranother was. I waould greatley appreciate it. My e-mail address is hvacnathan@windstream.net.
ReplyDeleteJust thought I would let you know I made one and blogged about it here http://crafting365days.blogspot.com.au incase you would like to see how you inspired me! Thank you so much for sharing your wonderful owl!
ReplyDeleteI made one earlier this week for a blog hop I'm in and it was so fun to do. You wrote a great tute...thanks so much! You can see a pic of it on my blog here - http://cindysdaisydays.blogspot.com/2013/09/pin-it-hop-meet-mr-gray-owl.html
ReplyDeleteI am unable to download the pattern. Please send to my e-mail. ahaak945@gmail.com
ReplyDeleteI think the owl is so adorable.
I AM UNABLE TO DOWNLOAD THE PATTERN.PLEASE SEND TO MY EMAIL VABOWHUNTER83@MSN.COM
ReplyDeleteTHE OWL IS ADORABLE.
THANK YOU.
Thank you so much for this very cute pattern!
ReplyDeleteShannon... I gave away several at Christmas and almost started a family feud when I used one at a yankee gift swap with lots of crafters... I greedily use two myself...one at the sewing machine and one by my chair in the living room with my crochet hooks ablunt needles. the owl is much cuter than a cup ofhooks that I was always dumping over. <3
ReplyDeleteYou should add a link to the parade of owls..such great inspiration!
Thank you so much!!! It's my first work with Crafty, very fun and easy!!!
ReplyDeleteHe's so cute!!! So glad you enjoyed it! I love seeing everyone's pictures!!
ReplyDeleteI will do that! Never did I think this pattern would be so popular! I'm so glad everyone is enjoying it and have been floored with the the huge positive responses I've gotten. It just motivates me to want to design more patterns!
ReplyDeleteYour so welcome! Enjoy!
ReplyDeleteOwls are so popular...and more than that this one is def useful! keep up the good stuff Shannon, you rock!
ReplyDeleteI just finished two of these cute owl buddies! Can't wait to start using them!
ReplyDeleteLove these going to have a go at making one not much good on my sewing machine but think I could manage this..
ReplyDeleteThank you wonderful idea...I'm still working on mine and will send you pic as soon as it's finished! Just one question, on the pattern it says to cut 4 wingy ding pieces but it can't work if they are all the same... I mean it would be impossible to match them right sides together...!?!??
ReplyDeleteNope you will be fine. I fold my fabric right sides together, then cut 2 from the pattern.. make sense?
ReplyDeleteNow yes!!! Thank you,,,
ReplyDeleteShe's adorable!! I really like how you've used her wings as a pin/needle holder. I'm going to have to do that with mine! And wow I'm so flattered that this is your first ever project! So glad you enjoyed it and learned from it!! :)
ReplyDeleteOh I did enjoy making her. I've got 4 more cute and ready to sew. Will embellish with things and stitches. They are going to make great gifts. I chose your pattern because you had it layed out so simply. Very easy to follow which is great for a brand new sewer like me. I'll share them when I finish.
ReplyDeleteThank you so very much for this wonderful tutorial. Your pattern was thorough and easy to follow. I so enjoyed make one for a recent swap that I've shared your link with fans on FB and Flickr. I know so many are going to love this! Thanks again ♥Lisa
ReplyDeleteFor more pics http://on.fb.me/1cuX6wR
Oh my gosh your owl is adorable!! Thank you for sharing! I'm so glad you enjoyed the pattern.
ReplyDeleteLove this little person! Made one (filled with sewing supplies) for my granddaughter this last Christmas and she loved it (her). First thing she did was take all the sewing supplies out and put in her pencils and pens! Then she ended up taking her to school where all her friends loved it, but one in particular wanted one. So she asked me to help her make one for her friends' birthday last month, which she did and has passed along a wonderful little friend.
ReplyDeleteLINDO TRABALHO PARABÉNS...
ReplyDeleteUnable to download the pattern, would love a copy
ReplyDeleteCould you email me at shanniloves@yahoo.com and I would be happy to send you the pattern.
DeleteThanks!