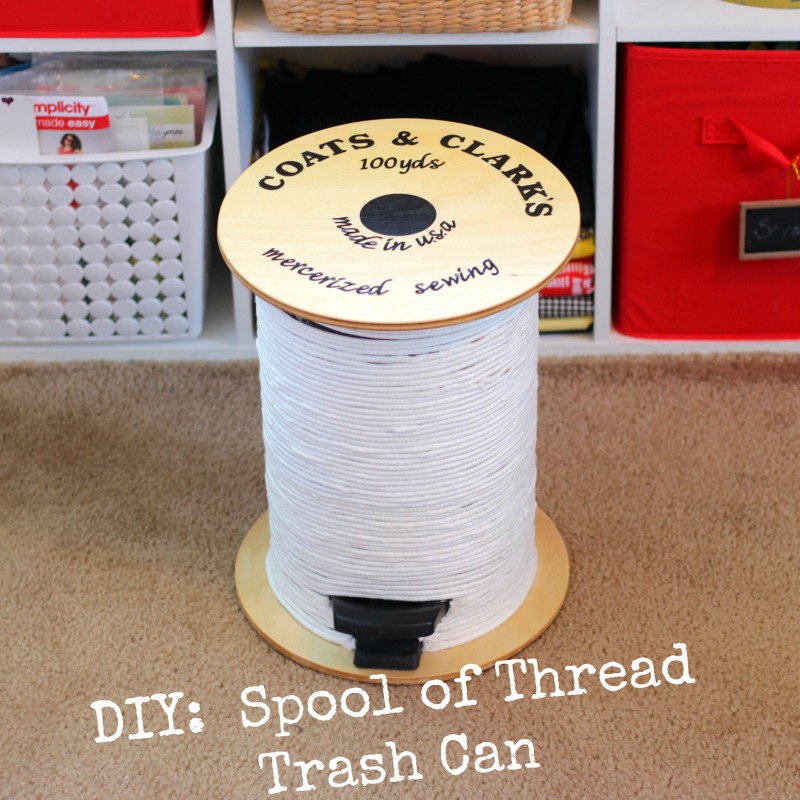
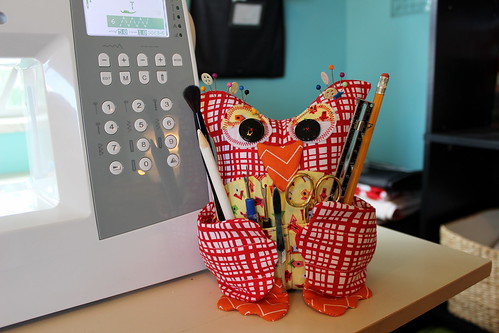
Whoa guys I feel like it's been a long while! We had a terrible windstorm that knocked our internet out for 2 weeks. We had winds in excess of 60 mph! Yikes!! I have never seen anything like it before. Thankfully the wind didn't blow me away and I'm here to share with you a fun DIY project. Man o man I so wish I could say I'm the genius behind this idea but I am not. This is one of those projects you see and your like, "Man! Why didn't I think of that!?" This idea was shared by a fellow member of a sewing group I'm in on Facebook. Ugh, I'm in so many sewing groups, I'm sorry I don't remember the exact group it was but she had made one for her sewing room and shared a picture. I thought it looked like a pretty fun and easy project to recreate so I thought I'd show you how I made mine. I think every sewing nerd needs a trash can like this!
Last Fall I made some candy corn bunting to decorate my office at work. I wrote up a tutorial and everything and it never did see the light of day on the blog. I did share it back in January at Cut Out and Keep but who really cares about Fall/Halloween decor in the middle of winter?? I patiently waited until the appropriate time to share it all with you.
I created this tutorial for Cut Out and Keep's website back in January and never got a chance to share it here on the blog. Sewing life is stagnant at the moment so now is as good a time as ever to share this easy project with you all. We need a little inspiration sometimes to get us going or just a little reminder that it's OK, mistakes happen, just pick up your seam ripper and move on. So if your interested in DIY'ing your own inspirational banner to jazz up your sewing space then please read on.
Minions...they're everywhere! On my television, on my cereal box, in my Happy Meals...#noshame and in my Pinterest feed. After their debut in Despicable Me I along with a million others was left wanting to see more of these adorable little guys. I'm probably the only one who hasn't seen the Minion movie yet. It grossed $115.2 million in North America alone it's opening weekend!! So to celebrate these loveable yellow dudes and to add to my Happy Meal collection I made a pincushion.
For one of my more recent posts on the Fabric Mart Blog I was asked to make a pattern by Thread Theory for their "In the Studio" Series. I chose the Stratchcona Henley because I thought it would be an easy make for my husband. Boy was I wrong!
I have a tutorial for you today! If your waistband is feeling a little snug don't throw those jeans out just yet. I have a rather simple fix...extend the waistband with elastic.
My biggest sewing pet peeve...misplacing my seam ripper(s). I spend more time looking for my seam ripper than I do anything else. I lose it, go buy another then pretty soon the lost one shows up...lose it again, buy another..you see it's a vicious cycle. While browsing Pinterest one day I spotted the cutest owl remote control caddy. This inspired me to make my own "Owl You Need" sewing buddy for the Dear Stella/Kollabora project challenge.
This wise old owl sits next to your sewing machine and holds all your important tools for easy access...marking tool, seam gauge, a seam ripper (or two), tiny scissors to cut those loose threads and a fluff brush and tweezers to keep your machine clean and happy. You can even use him as a pin cushion!
Need your own sewing buddy?? Why don't you download the pdf instructions/pattern and sew along with me in this tutorial! It's free!!
CLICK HERE FOR PATTERN
**when printing your pattern make sure in your printer options, Actual Size is checked.
**if you have trouble downloading the pattern from Dropbox you can also
download the pattern from Craftsy here. You will just need to sign up for an account which is
totally free.
**this pattern is my own and I designed this for my readers for free.. I ask that you please don't
distribute or sell this pattern, finished or otherwise..Thanks!
What you will need:
Pattern
Fabric - I will be using Dear Stella Design's Clementine fat quarter bundle
Thread
Pins/Needle
Scissors
Fusible Fleece
Polyfill
Rice
Two Buttons
Any embellishments you desire..how about a bow or a button heart?
Step #1...
Cut out your pattern pieces. *Note: Pattern Piece page 2- if you would like your owl to have a contrasting belly cut this pattern piece out for the front of your owl. For this tutorial I will be making this version.
![]() |
![]() |
Step #3...
If your making the owl front body only one color you can skip this step. For the contrasting owl front pin your two pieces together, belly to head, right sides together. Stitch 1/4 inch seam. Trim seam and iron flat.
Step #4...
Take your pocket piece and fold top edge down 1/4 inch, iron, fold over again 1/4 inch and iron. Topstitch in place.
Step #5...
Place wrong side of pocket piece on right side of owl front body lining up edges and pin in place. Find center and topstitch from top of pocket to bottom.
Step# 6...
Take your two eyeball pieces and place on owl front where you'd like them. Now take your eyelid piece and cut in half. Place on top of eyeballs and pin in place. Zig zag stitch around eyeball and across bottom of eyelid. Zig zagging in a circle can be tricky. I found that stabilizing your eyeballs with a lightweight interface helps. Also instead of pinning in place you can use the awesomeness that is Steam a Seam or fusible web to hold in place. It doesn't have to be perfect. That's what makes your owl unique. You can attach your eyeballs anyway you like. See my girl owl below. I cheated and just used Steam a Seam.
Sew your buttons in place on top of eyes.![]() | |||
I can see!! |
Step #7...
Take two of your wingy ding pieces and pin right sides together. Stitch 1/4 inch around edge of wing and make sure to leave end open so you can turn inside out. Trim seam 1/4 inch including the end you left open. Iron and turn inside out. I used a point turner to form fingers. Be careful that you don't poke through your seam. I speak from experience! Iron flat once wings are formed to perfection. Topstitch wing to create a 3 feather look. Repeat for second wing.
Step #8...
Place wingys on top of front owl body in correct spots lining up edges. Place owl back piece on top with right sides facing. (make sure your wings are arranged correctly so you don't catch bottom of your wings when you stitch around edges..hope that makes sense) Stitch around owl 1/4 inch leaving about a 2.5 inch opening at side. Trim seam and iron. Flip right side out, iron.
**Note: You may also chose to attach your feet here too as well. I actually tacked mine on to the front, which I go through in Step 10 but I later found that actually sewing them on here like you do the wings works just as well.
Step #9...
Fill bottom of owl with about a cup or so of rice to give it some weight so it will sit upright and not want to fall over like a weeble wobble. (there's a group for those if your interested!) Stuff the rest of your owl with polyfill. Stuff him good too! Slipstitch opening closed.
Step #10...
Take your beak pieces and place right sides together. Stitch around beak 1/4 inch leaving a small opening at side. Trim seam and iron. Turn inside out, iron and slipstitch opening closed. Now stick that nose on his face! You can either sew in place or take the lazy route like me...a little tacky glue works perfect!
Now do the exact same thing with his feet.
![]() | |
Sorry forgot to take a picture of the finished nose |
Step #11...
You are all finished! Now you got a little buddy to keep track of all your tiny sewing notions. You can leave his wings floppy or you can hand sew or glue them in place. I like to make mine look like he's hugging all my sewing gadgets.
Embellish these little dudes how you want. I found these cute little handmade tags at Joann's. I added a bow for the girl. Now I can't decide which one I want to use!! They are both too cute!
Hope you all enjoyed this tutorial and make your own sewing buddy. I would love to see him/her! Email me a picture if you do!!
I have a couple other Dear Stella/Kollabora projects planned that I'm hoping to get done. Head on over to Kollabora.com to take a look at the projects submitted by the other bloggers. A lot of talented craftiness going on!!
Edit: Since releasing this free pattern I've gotten such a huge response and pictures of everyone's owls. I created a blog post showcasing everyone's buddies. You can see them all here.
Not too long ago I got a new machine. A Singer Signature and it does all kinds of fancy stuff. I won't lie I bought it for that fancy stuff too, fancy stuff that most likely I'm never gonna use. What can I say, I'm a sucker for fancy stuff. My husband often makes fun of me at the grocery store for some of the things I buy, like cookies with fancy writing on the package. Yes I'm being accused of buying cookies merely for the fancy writing on the package. You know that fancy writing makes them cookies taste better.
![]() |
These cookies look delicious damn it, fancy writing or not, so stop giving me shit and throw them in the cart already! (and I can vouch,these cookies are delish!) |
So anyway back to my sewing machine, it came with a lot of feet, 20 to be exact. I have no clue what most of them are. I decided to do a little research on them and thought I'd share with you all. I don't usually talk about my feet but I'm hoping some may find this helpful. I'm also hoping you all will be open to share your feet with me. The feet or foot I'm going to discuss today is the cut-n-hem foot.
----CUT N HEM FOOT----
I was pretty excited about this foot when I first seen it. I don't have a serger and to be honest I'm quite scared of one. All that threading looks like a headache. I thought this would be the perfect replacement. This foot is used to trim excess fabric while sewing and creates a finished edge, much like a serger. If you can see the screw at the front of the foot, it is holding a teeny tiny blade that trims the excess fabric. I know what your all thinking, that blade isn't going to last forever and you are absolutely correct. I tried her out and one thing I learned, always follow directions and don't have your face plastered as close to the machine as you can get it while sewing with strange feet. This foot is only to be used with a zig zag or overcast stitch. Using a straight stitch is a for sure way to break your needle and almost poke your eye out. Good thing I had my glasses on! First to start you want to make sure your foot is attached correctly. I know all machines are not created equal so I'll spare you my details. Cut a 1 inch by 1/2 inch wide notch in your fabric and place it over the front part of the foot and under the little lippy thing. Sorry I know I'm sooo good at describing things.
Now before you hit the gas this is the perfect time to make sure your on a zig zag stitch or overcast stitch and for pete's sake sit up straight and back away from the machine!
The results aren't too shabby. I will probably find this foot useful for small projects like finishing the edges of pocket lining. I don't see it working too well on a heavy weight fabric. The blade is prone to wear out rather quickly making it absolutely useless. I'm sure you could probably replace the blade that is if you can find replacements. I also take back what I said about it replacing a serger. I'm sure all you more experienced sewers are laughing at me right now. A serger does a more eye pleasing job. But for those of us that don't have a serger just yet there are tons of other options for finishing edges, a plain ol' zig zag to start and let's not forget about the trusty pinking shears!
So if your all still with me and have not stopped reading due to boredom do any of you have this particular foot and have you found it useful? Was this post helpful to anyone?...anyone?...wanna hear about my other feet!? Why do I feel like I'm in a once crowded, now empty room tapping on my microphone to make sure it's still on??
After watching tons of you tube videos and reading others tutorials on making your own dressform out of duct tape I decided to go for it. It's a lot cheaper than the alternative and more true to your size, not to mention loads of laughs if you do it with someone you like.
First step my husband made me a stand using a huge wooden spool that wire came on. We had it leftover from when he ran electricity out to his shop. I wouldn't let him throw it away because I knew I could recycle it somehow. He cut it down an bit and used an old piece of pvc pipe to mount in the center for the pole. Almost forgot we bought some rollers for $5 at Lowes and mounted those on the bottom so I can easily move it around. You can also make your stand out of an old floor lamp, umbrella stand, pvc pipe, etc.
So next was the actual wrapping of duct tape. Make sure you wear an old shirt you don't care about because your not getting it back! I had an old long sleeve turtle neck which worked perfectly. It wasn't quite long enough so I just taped some extra fabric to the bottom.
Let the wrapping begin!!!
I wanted my form to be white so I had Ryan first use the silver duct tape then had him put a layer of white over the top. We used 2 rolls of silver and 1 roll of white.
Ryan wrapped me too tight in parts. My arms started going numb and I felt like I couldn't breath at times. So being the funny guy he is he started cutting jokes making me laugh. It's hard to control your bladder when your wrapped tight in duct tape. I thought I was gonna pee my pants. After your wrapped cut it off in the back, tape it up, stuff it with old newspaper and mount it on your pole. I used a hanger inside mind to make it easier to hang on the pole. Also after I had it stuffed and mounted on the pole I took insulating foam (Great Stuff foam from Lowe's) and filled in the gaps. I just felt around on it and any empty spaces I felt I cut a slit, stuck in the foam tube and sprayed, sparingly!! This stuff goes everywhere. So 2 hours and a panic attack later here is the finished product......I added some zebra duct tape and fabric around the bottom to make it pretty :)
If your considering making your own dressform I suggest you watch this youtube tutorial by Tish.TV DIY or read this Threads article. Total cost for my dressform was $21!!
NOTE: After using my dress form a couple times I ended up having to cut the arms off at the shoulder. It was too hard getting things on and off the form with the arms. So I recommend only taping to your shoulders. Also after a while the duct tape gets sticky and will leave glue on your pins. Pad your form out with batting to avoid this.
It's much too cold today to go out and about so I thought I'd stay inside and make use of all my Goodwill finds. First up is this groovy shirt.
Despite my hubby telling me I looked good in it didn't sway my decision any. I still took the scissors to it. I pretty much followed this tutorial I found on AllFreeSewing.com.
For the lining I used an old pillowcase. I cut the outer and lining fabric at approx. 18.5 x 13 inches.
I also cut iron on interfacing for both panels. I only had a lightweight interface so I had to make due with that. A heavy weight interface would definitely be better. With right sides facing together I sewed the two long sides and one short side together. I allowed for a 1/2 in. seam allowance. I discovered Polyester is not the easiest fabric to work with. By the time I got done sewing the last side my fabric had puckered and was all lopsided. In came my handy dandy seam ripper whom I've acquired a love hate relationship with.
I didn't want my flap to be straight across so I measured about two inches in on each side and sewed at an angle. Then flipped it right side out and ironed it.
I then top stitched around the three edges, 1/4 inch. I used Sulky thread in a real pretty dark gold color. So by this time I realized how flimsy my clutch was going to be. Luckily I've been hoarding all the old enevelope boxes my office has been throwing out. I knew I'd find good use for them!
Laid out my fabric and traced around. I only cut enough cardboard for the flap and back of the clutch. I didn't line the front of the clutch with cardboard because I didn't want it to be too stiff. I wanted to be able to cram a lot of stuff into it if need be and it be able to expand.
Next step was inserting the magnetic clips. I took some time folding up the clutch in equal thirds to make sure it was the size I wanted it to be. I actually ended up cutting about 1/2 in off the unsewn bottom to make it a little smaller. The clips were super easy to attach. I just marked where I wanted them and inserted them into the fabric. They were the kind with the prongs on the back that you insert it between the two layers. If you've ever worked with them then you know what I'm talking about. Next step is finishing up the final raw edges by folding in, ironing then sewing about 1/4 in from the edge. For some reason this took me the longest. I used the seam ripper three times on this task. First time was because my lovely polyester fabric puckered and I didn't like it. Second time was because halfway in my bobbin ran out. Now I know I could just re thread my bobbin and start from where I left off but it didn't look right to me so I ripped it out and started over. I'm such a perfectionist. Third time I had the same problem as the first. I finally took the time to pin it to death so there was no chance of it moving when I was sewing.
Final step is turning the bottom part inside out and sewing the sides. Fold it right side out and iron.
And there you have it, a groovy clutch!! I just love it!
Now I just need some place to go!!!